Car Paint and DIY Car Paint Kit Guide: How to Choose and Use a Car Painting Kit
Can a driver achieve a factory-quality result with a retail car paint kit? The honest answer depends on surface preparation, product quality, and technique. Professional painters spend years developing spray control and eye for surface imperfections that affect how car paint bonds and flows. That said, a well-chosen car paint kit — combined with careful prep and realistic expectations — produces results that protect the metal and significantly improve appearance on localised repairs.
A diy car paint kit typically includes a primer, basecoat, and clear coat, along with surface prep materials like tack cloths and scuff pads. A car painting kit designed for full-panel or full-vehicle application adds more product volume, a spray gun adapter or aerosol system, and often mixing ratios calibrated for different ambient temperatures. Car paint kits vary widely in finish quality, chemical resistance, and longevity — understanding the differences prevents buying a product that will not hold up to washing or sunlight within a season.
Choosing the Right Car Paint Kit
The first decision in choosing car paint kits is whether the job is a spot repair, a panel re-spray, or a full vehicle repaint. Spot repair aerosol car paint kits are sufficient for small chips and scratches up to a few centimetres. Panel-level diy car paint kit options in spray gun format cover larger areas more evenly and with fewer recoat seams. Full vehicle work requires significant volume, consistent environmental conditions, and equipment beyond what most retail car paint kits supply.
Colour matching is the most common problem with retail car paint kits. Paint codes appear on a sticker inside the door jamb and should match the code used to mix or select the product. Even with a correct code, aged original paint may have faded enough that a fresh colour application appears visibly different in raking light. Professional painters often tint mixed paint to match actual panel colour rather than the original formula.
Surface Preparation Before Painting
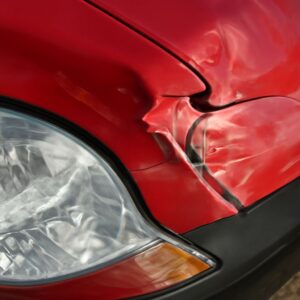
No car paint kit produces lasting results without proper surface preparation. Rust must be removed to bare metal, treated with a rust converter or etching primer, and sealed before topcoat application. Paint edges around a repair area should be feathered — gradually thinned — so the new car paint blends into surrounding surfaces without a hard edge that telegraphs the repair.
Cleaning the surface with a wax and grease remover immediately before applying any car painting kit product is non-negotiable. Fingerprints, silicone residue from detailing products, and airborne contamination prevent paint adhesion and cause fish-eye defects in the finish. Working in a dust-controlled environment — even a closed garage with the floor dampened — reduces contamination during application.
Application Technique
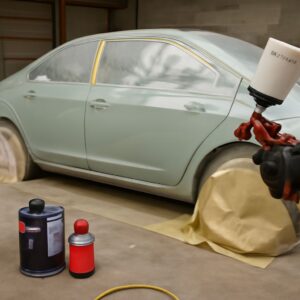
Aerosol car paint kits require consistent distance — typically 25–30 cm from the surface — and overlapping passes at a steady speed to avoid runs or dry spots. Multiple thin coats produce better results than single heavy coats. Each coat should be allowed to flash off (become touch-dry) before the next application. The number of basecoat layers and the flash time between them affect how the colour builds and how the clear coat bonds.
A car painting kit with a spray gun system gives more control over fan pattern, fluid rate, and air pressure, but requires calibration for each product’s viscosity. Manufacturers publish recommended spray settings in the product technical data sheet. Deviating significantly from these settings — especially running too much air pressure — causes the finish to texture like orange peel or dry out before reaching the surface.
Clear Coat and Finishing
Clear coat in most car paint kits protects the colour layer from UV degradation and provides gloss. It should be applied within the basecoat’s recoat window — the time period during which the basecoat surface is chemically active enough to bond with clear. Missing this window requires light sanding before clear application. After full cure, which takes 24–72 hours depending on product and temperature, the surface can be wet-sanded with fine-grit paper and polished to match the gloss level of surrounding panels.
Next Steps
Before purchasing diy car paint kit products, measure the repair area, identify the paint code, and confirm the application method — aerosol versus spray gun — that matches the job size. Order a test panel or small quantity to verify colour match before committing to a full application. Allowing adequate curing time before washing or exposing the car paint to rain is the single most common oversight that reduces finish durability in DIY repairs.